Embed Luma on Your Website
To embed checkout / registration, go to the manage page of an event and navigate to the More tab. You’ll find the “Embed Registration Button” with a code snippet.
Copy the code snippet and paste it into your website, and congrats — you have added the Luma checkout widget to your website! 🎉
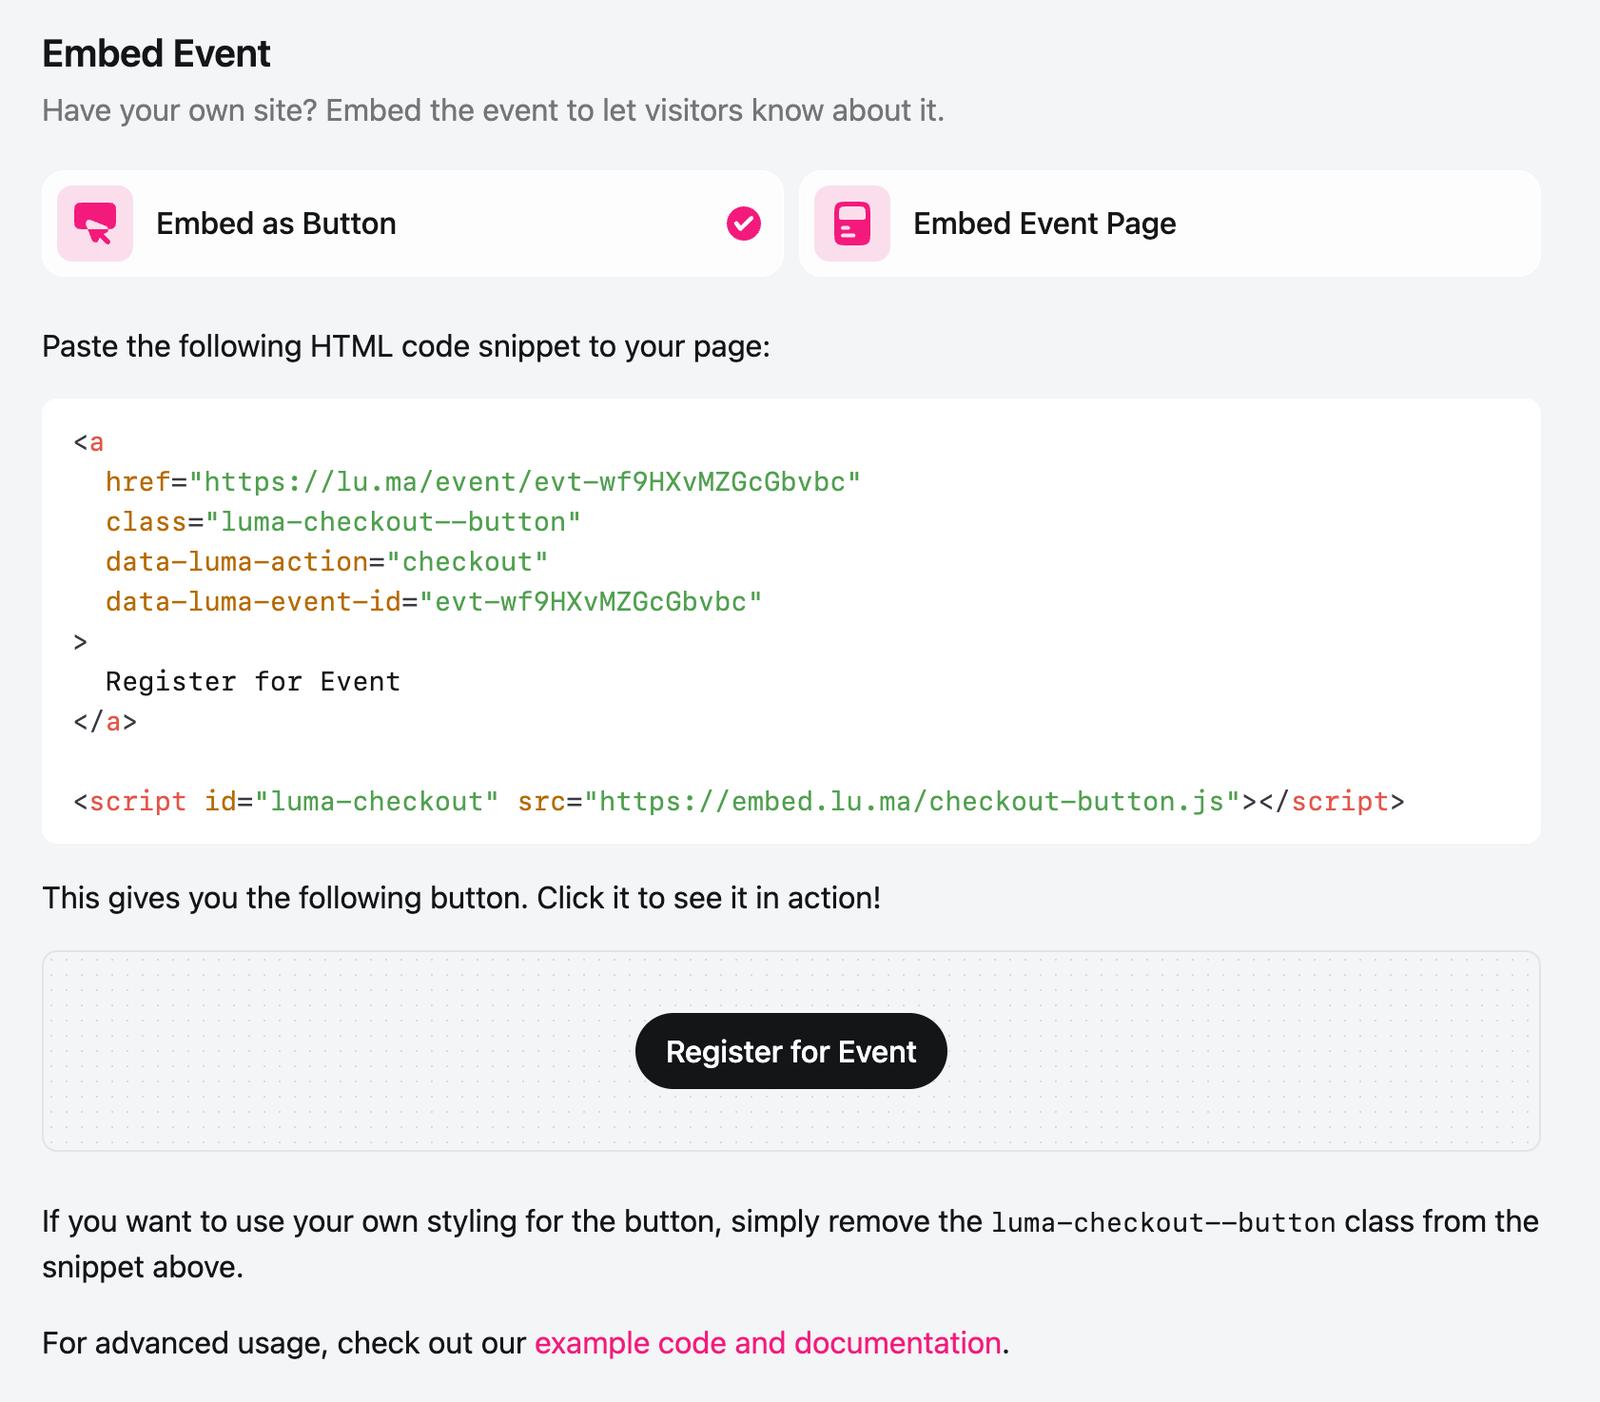
As seen in the above screenshot, we have two options:
-
Embed as a Button — When you embed as a button, users can click the button to see the event registration flow in an overlay.
You can customize how this button looks using CSS but you cannot customize the overlay.
-
Embed Event Page — You can embed a small version of the event page directly on your site which shows information about the event and let’s them checkout directly there.
You are not able to customize how this event page looks.
Pre-Apply Coupons or Tag Registrations
You can add two optional attributes to the embed button:
data-luma-coupon="CODE"— pre-applies a coupon or unlock code when the checkout opens.data-luma-utm-source="source"— tags registrations with a utm_source so you can see them in your event insights.
For example:
<a
  href="https://luma.com/your-event"
  class="luma-checkout--button"
  data-luma-action="checkout"
  data-luma-event-id="evt-xxx"
  data-luma-coupon="SUBSCRIBER10"
  data-luma-utm-source="newsletter"
>
  Register for Event
</a>
If the attributes aren’t set on the button, we’ll fall back to ?coupon= and ?utm_source= on the host page’s URL.
Pre-Select a Ticket Type
If your event has more than one ticket type, you can open checkout with a specific one already selected. This is handy when you want a separate button for each ticket on your own page, so the guest’s choice carries over instead of landing on the first ticket.
Add data-luma-ticket-type="ttyp-..." to the button:
<a
  href="https://luma.com/your-event"
  class="luma-checkout--button"
  data-luma-action="checkout"
  data-luma-event-id="evt-xxx"
  data-luma-ticket-type="ttyp-xxx"
>
  Buy VIP Ticket
</a>
To find a ticket type’s ID, go to the Registration tab on your event’s manage page and click the ticket type to open its panel. Open the ⋯ menu and choose Copy Ticket Type ID.
For the Embed Event Page option, add ?tt=ttyp-xxx to the iframe’s src instead. If the ID is missing or that ticket isn’t available, checkout opens on the first available ticket.
Ad & Campaign Tracking
Beyond utm_source, the Embed as Button option automatically forwards standard campaign and ad-click parameters from your host page’s URL into checkout — so you don’t need to tag each button. This includes utm_campaign, utm_medium, utm_content, utm_term, and ad-click IDs like gclid, fbclid, and li_fat_id. When a guest clicks the button after landing from an ad, these parameters carry into Luma so your registrations stay attributed to the right campaign.
The Embed Event Page option uses a fixed iframe URL, so it won’t pick up your host page’s parameters on its own. To attribute those registrations, add the parameters to the iframe’s src yourself — either hardcoded or filled in from the host page’s URL:
<iframe
  src="https://luma.com/embed/event/evt-xxx/simple?utm_campaign=spring&gclid=..."
  ...
></iframe>
These parameters are stored with the registration and appear in Luma’s event insights, exports, Zapier, and webhooks.
Track Purchases in Google Analytics
Browsers block Google Analytics cookies inside a cross-site iframe, so a Google tag can’t send events from inside embedded checkout. Instead, when a guest registers, the embed posts a luma:purchase message to your page so your website’s own Google tag records the purchase — in the guest’s real session, with full campaign attribution.
Embed as Button — automatic. Luma’s embed script forwards the purchase to your page’s gtag (or Google Tag Manager dataLayer) as a standard purchase ecommerce event. You just need Google Analytics installed on your site.
Embed Event Page — add a listener to the page containing the iframe:
<script>
  window.addEventListener("message", (e) => {
    if (e.origin === "https://luma.com" && e.data?.type === "luma:purchase") {
      const { transaction_id, value, tax, currency, coupon, items } = e.data;
      const purchase = { transaction_id, value, tax, currency, coupon, items };
      if (typeof gtag === "function") {
        gtag("event", "purchase", purchase);
      } else {
        window.dataLayer = window.dataLayer || [];
        window.dataLayer.push({ ecommerce: null });
        window.dataLayer.push({ event: "purchase", ecommerce: purchase });
      }
    }
  });
</script>
The message includes the order ID as transaction_id, purchase value, tax, currency, coupon when one was used, and ticket-level items. It fires for free registrations too, with a value of 0. See Google Analytics Measurement ID for how tracking works on Luma event pages.
Using Google Tag Manager? GTM doesn’t define a global gtag, so the snippet pushes the purchase to the dataLayer instead. In GTM, add a Custom Event trigger for purchase and a GA4 Event tag with Send Ecommerce data enabled, then mark purchase as a key event in GA4.
Test It Out
The Register for Event button on the manage page gives you a preview of how embedded checkout works. click on it to see what the widget looks like.
You can see more examples in this Github Repo and this demo website.
Apple Pay
Apple Pay doesn’t appear inside embeds. If Apple Pay matters to your checkout, link directly to your event instead:
<a href="https://luma.com/your-event">Register</a>
Notes
- You’ll need a website platform like Squarespace or Webflow to embed the Luma event page on your site. You cannot embed the button in an email.
- We have all of the embed options listed on the Manage Event page. If you want even more control, you could look into using the Luma API.
Embed Calendar
You can also embed all upcoming events for your Calendar onto your website. To do so:
- Open luma.com/home/calendars
- Choose the calendar you’d like to embed
- Navigate to Settings → Embed
- You’ll see all of the embed options there